Thursday 22 December 2011

A Christmas miracle

They fulfilled their promise. Windows in before Christmas. 28 windows and two doors fitted in two days. Some small stuff to do in the New Year, but we're really pleased with how this looks, and the fact the house is now sealed.

It's hard to get a good photo with the scaffolding still up, but this should give an impression of the shiny newness.
South (front) facade.
West gable.
 As the window openings on this side were open to the elements overnight, I'd covered some with plastic. Forgot to take it off after the windows went in!

Living room, looking at the west gable from the inside.
North (back) facade.

The way out to the (distant future) patio.
I'll try to get better photos once the excitement of Christmas has passed.

Tuesday 13 December 2011

Having a blast

Corny, but literal.

We borrowed a rather ancient-looking sand blaster on the advice of a neighbour, even though every instinct screamed against using such a thing on wood. Having done some research, we got fine-ground nutshells as the blast media, as well as fine sand to use on stone walls. The reasoning was that sanding every beam by hand is an extremely slow process, and it's difficult to get old plaster out of cracks and pits. So, only one way to see if the neighbour was right.
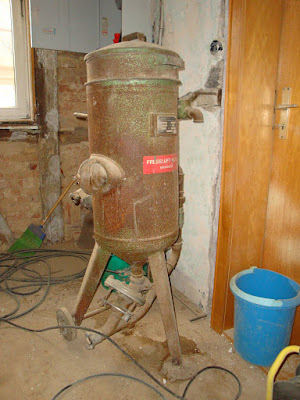
I never knew this is what a sand blaster looked like.

 Suited up with a disposable overall and a full face particle filter mask, it felt rather Ghostbuster-ish, but dirtier. A diesel-powered compressor provided ample power, but regulating the flow of blast material from the old device was quite tricky. However, the first results on the beams in the kitchen were really good

Six-metre oak beam spanning kitchen, before.
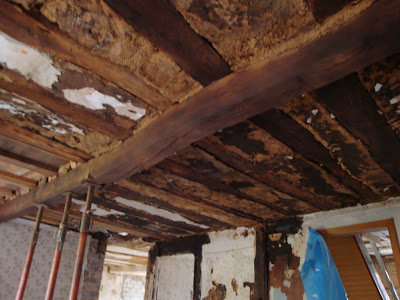
And after cleaning with ground nut shells.
There is some fine stippling on the surface, but I think it did a fine job at clearing off smoke stained areas, old plaster and dirt. The other beams cleaned up well, but they aren't the smoothest to begin with, so we're considering plastering over them, as it was in the original design. I'll do some work with the brush sander to see if the surface can be improved.

After this success, I collected and sieved the material to reuse on the beams in an adjoining room. Maybe not the smartest, as the now dust-loaded material basically created a smoke screen that was neigh on impossible to see through. Well, that and blasting parts of old clay plaster. The results were ok though.

The next test was to use fine sand on the exposed stone wall in the living room. This had been proving difficult to clean by hand, with large chunks of plaster on an uneven surface. Visibility was dreadful while doing this, at times being less than a metre, so some spots were missed, but it was considerably faster and, well, better! I'm not exactly happy using sand due to the risks of silicosis, so am hoping the P2 filter on the full mask is sufficient!

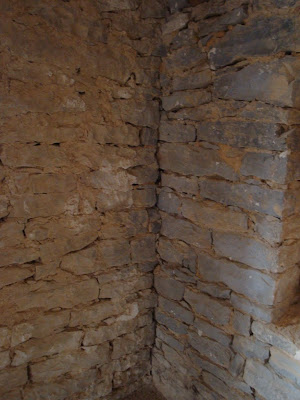
Left: before. Right: after.
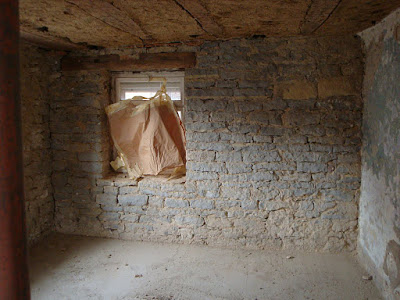
Almost complete.
I tried the sand on a painted beam in the living room, but I'm not happy with the results as it ate into softer parts, leaving a surface I didn't like. I'll consider solvent-based strippers to finish it.

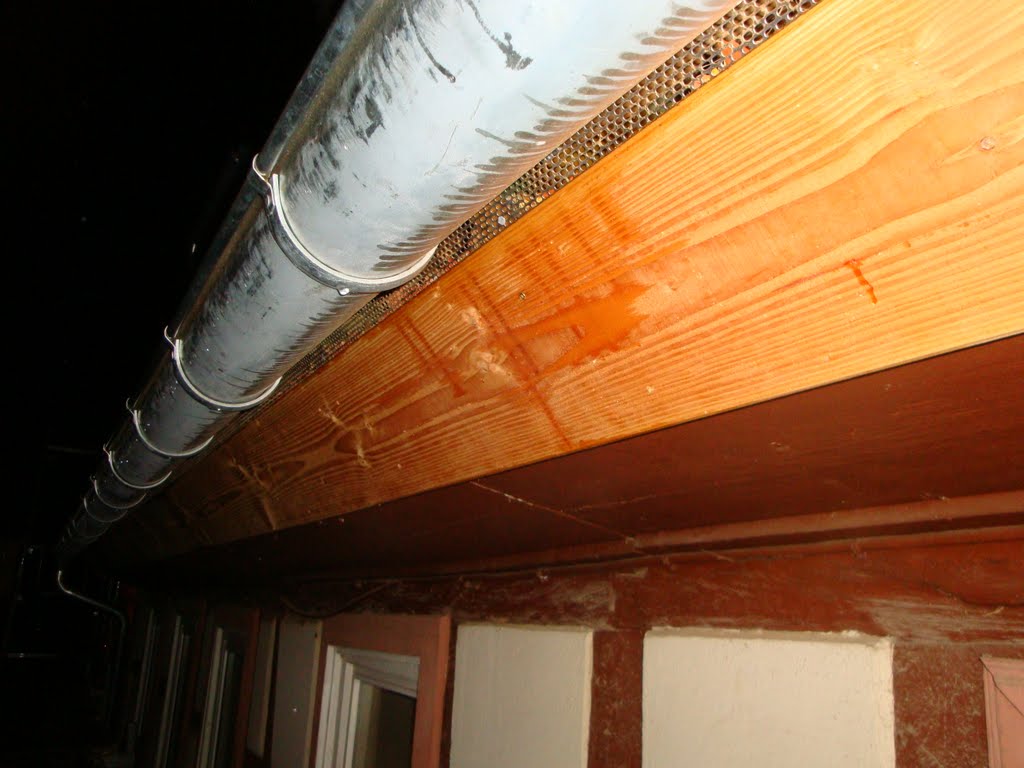
In other news, the guys are back putting paper lining inside the roof as preparation for the cellulose insulation getting blown in.


And after rerouting some piping at the back of the house, the water issue in the cellar seems to have abated, while the roof water issue has been discovered and will be soon resolved (it was driving rain getting behind flashing, as the dormers are not plastered yet.


Sunday 4 December 2011

Rising tide

Our shiny new concrete floor in the cellar was finished a couple of weeks ago. I'd been meaning to take some photos, but not under the circumstances I found tonight. For the past three days we've had rain for the first time in over a month, following the driest November since 1920. While doing a quick inspection tonight, I found that there is water rising around the walls of the cellar, getting over the damp proof membrane, and coming out onto the surface. Not good!

Photo is a little poor, as auto-focus doesn't like the dark.

I'm hoping this is temporary, as there is a rainwater down-pipe on the other side of this wall that is not fully connected. I'm hoping this is contributing, and not that the lower level of the new floor has somehow gone below a water table we were as yet unaware of. It is over a metre below ground level at this point, so it could well be, and the fact there is now hardcore, topped by a membrane and then 15cm of concrete might just be fording water up the wall more than before, when it was just clay and stones. Frankly, I'm worried, as this just cannot be good for the foundations or the walls.

Small pools of water at foot of wall, coming over damp/proof membrane.
 In the same cellar, towards the front, one of the walls is completely wet, not just damp, even a metre up. It's possible that a broken gutter on the adjoining barn is splashing onto the outside wall and it is coming through and down, rather than from the ground, but it's a lot of damp.
East gable, south end, and a big patch of wet wall.

See? Wet, not just damp.
Meanwhile, this is the first real rain test the finished roof has had. The inside is still not finished with paper and laths for the insulation, so we can see the back of the fascia boards, insulation boards and everything still. Which is good, as it can be seen that just below the small downpipe from each of the dormers, there is water somehow getting under the tiles and flowing down the inside of the fascia boards. Definitely localised to each of the four downpipes. From the outside, it can be seen that water has come out from under the eaves. I'm pretty sure that at least this is fixable, but not sure if it's a problem with the flashing or the tiles, or splashback from the main gutter (unlikely). Tomorrow, I'll ask for the tiles to be removed to we can see where it's coming in. This definitely has to be fixed before cellulose insulation is blown in in the next couple of weeks!

Water coming down under the tiles, and over the fascia board.
Really don't need these issues now.

Tuesday 22 November 2011

Windows finally ordered

Some progress on the windows front. We met with Herr Sauer (the window man) and Herr Keller (our architect) yesterday evening to finalise details for the windows, after weeks of toing and froing.

We've decided on six panels per window for the most part, except the smallest of them, which will have no muntins (now there's a new word for me. I knew what they are called in German - Sprossen - but just had to check the English term), while the slightly smaller windows on the west gable, second floor will have four panes.

We've gone for French door style from the kitchen to the back garden, with a secondary entrance looking a little more like a cottage door. I think Herr Keller would have preferred more glass, but the Irish in me stuck to what we felt we liked best, for good or for worse.

The best part is that Herr Sauer said we should have them in before Christmas! Originally the plan was to have them a few weeks ago, but if they can do it before Christmas we'll be delighted. My wife gave him a big hug, so maybe he'll stick to his promise.

This is what they should look like:

South facade, planned.
Note we haven't selected front doors yet. I'm thinking two that should be usable, and two should be false doors (four front doors would be pretty expensive!), but we definitely want them to be a bit rustic looking.

West gable, planned.

North facade, planned.
The windows and doors, especially at the back, will be have additional security to bring them to the so-called WK2 standard (or is it KW2?).
East gable, planned.

Monday 7 November 2011

Special delivery

I haven't been able to get a good look at the results of today's work (too bloody dark, and I can't walk on wet concrete), but it was a nice surprise to see this truck outside the house at lunchtime. That'll be the new floor of the cellar going in so!


Now there's been some discussion on whether the floor is too high, not leaving enough room for a screed and tiles, but it's a bit late now! Will just have to see how it looks tomorrow.

They also started breaking up the remaining half of the old kitchen floor, over the vaulted cellars. That'll need to be relaid carefully, as we definitely need room left for underfloor heating. It's going to be a tight fit, as the top of the vaulted cellars aren't that flexible.

Saturday 5 November 2011

Hardcore cellar

Last week the guys finished excavating two of the cellars and laid the pipes for the waste water. These have been covered with 15cm of hardcore (not yet finished), and we'll have 15cm of concrete to go on top of that, hopefully next week. The waste water pipes go as far as the wall, and another crew will come and dig a trench to connect it to the main sewer. Not very exciting, but it's a step towards having a new floor in the right two cellars.

Looking towards the back, cellar 4.
Ignore the pipe sitting on top, it's a spare. The upright one on the left is the main downpipe for the new bathroom and kitchen.

Looking towards the front, cellar 4.
Due to the way the old floor sloped (it used to be a cow stall), we'll have a step half way across the room.

Looking into cellar 3.
Cellar 3 also has a down pipe (not pictured) to accommodate the guest bathroom on the floor above. At the back left, the new door between the cellars can be seen (the one I broke a sledge hammer on while breaking through).

Meanwhile, we thought we'd waited long enough for the revised offer for our windows (7 weeks), so we paid them a visit and told them precisely what we want. A new offer was to be submitted on Friday, so hopefully we'll get that on Monday. If we accept that, it'll still be another 6 to 8 weeks before we have windows. Just in time for Chrsistmas! :P

Sunday 30 October 2011

Down down, deeper and down.

While away on a business trip last week, my wife called to say the general builder had sent two people to start excavating our cellar. I had to sit down. Today was the first chance to look at it (thanks Iberia!), and frankly, it's almost scary.

The idea here is to dig down enough to lay a layer of gravel (though I'd prefer expanded clay pellets or similar) followed by a concrete floor (though I'd prefer limecrete*) without undermining the foundations, which are likely to be more like a gesture, and not very deep. This is to break any capillary action, and keep the room as dry as possible, although we know moisture will climb the stone-built walls which are resting directly on moist clay.

The guys have excavated up to 40cm or more in places, as the previous floor had a slope to drain cow and horse urine out. As a result, the ceiling feels very high indeed! I'll be checking the footing tomorrow, as if they have gone too deep, settlement could be a serious issue, even over a few days.

Some pipes will be laid here, connecting to the main sewer line outside, and this will take all the waste water from the house.

The old floor level can be seen in the photo below as a dark line on the left wall, sloping down along the front wall towards the door.

Looking to the front of the house.
Looking towards the back.
Brick support for former feeding trough still hanging in there!
The clay under here is wetter than I expected, and is pretty elastic. I have the urge to clean as much as I can off the wall surface to minimise moisture creep, but I reckon that'll be futile.

*I was talked out of my ideas for a fully breathable limecrete floor, despite being something recommended by the Society for the Protection of Ancient Buildings as it reduces the need for water to creep up the walls. The current thinking is that if the floor is at least dry, it'll be better for the heating equipment will go in here - though it seems the main problem is what final covering to use on such a breathable floor. I'm not 100% convinced, but at this stage we'll go with the path of least resistance.

Sunday 23 October 2011

Hidden gold

No, not the kind I would have liked, but something to treasure nonetheless: old oak beams.

For a couple of hours most evening the past week, and all day Saturday, the beams in one of the attic rooms have been worked on to turn them from grey, dusty-looking timbers to rich, golden-brown beams, a couple of small steps away from being oiled.

Having played with several ideas (sand-blasting was considered) and methods (wire brushes on an angle-grinder versus nylon brushes), I settled on nylon brushes. One is a pretty specialised tool, a Makita brush sander, which is fast, powerful, yet gives lovely results without gouging into timbers. Hard-to-reach places have been handled with nylon brush drill attachments.


It's a lot of work, and perhaps there are better ways, but it's nice to get a feel for each individual timber in the place while working them by hand. And the results? Well, photos don't really do it justice, but hopefully it gives an impression.

Before.
After.


Before.
After.
Before.
After.

Before and after in one shot!

The roof rafters will be covered in a membrane and cellulose insulation will be blown in between them, so we only cleaned those beams that will remain visible once the final plastering is done. At this level, that might take a couple of years, but I want to get all the dirty work done first, so converting the rooms later is a little easier.

How dirty? This dirty:


Monday 17 October 2011

Progress report (not!)

No photos, because there hasn't been any progress! Extremely annoyed with all the companies supposed to be doing work for us.

The general builder hasn't shown up for weeks, despite promises. Apparently people are sick. They still have to excavate the cellar floors, lay new waste pipes, pour a new floor, remove the rest of the old kitchen floor and optionally install a rainwater cistern and excavate the field for a heat pump collector. To mention just a few things.

The window company that we met many weeks ago, and that was supposed to come back with a revised offer (relatively minor changes) STILL hasn't come back with the new offer, so we don't know when they say 6-8 weeks, will it be 6-8 weeks after receiving the new offer or after they measured up the windows.

The tender for the external insulation and facade work still hasn't been published (although we did take a long time considering what materials to use). Winter is coming, and it's already frosty here, and that's not good for the lime render we'd like to use. That, and the fact that the dormers are lined with wood-based insulation that should only be exposed to the elements for a few weeks, means I'm getting extremely impatient.

We have an offer for the heating system, which is relatively expensive, so we should go to tender, but that also seems to be going nowhere, so I'm tempted to simply take the offer (with me doing much of the installation of floor and wall heating to save as much as possible) just to get something moving!

And then we're told this is normal! I had high hopes for the German building trade...

Sunday 9 October 2011

More mindful destruction

It's has felt like a long week. Monday was a holiday, and although it seems to be generally frowned upon to work on such days, I took the opportunity to remove the last of the wattle and daub walls that need to go while we have a container to take it away. Now we have the start of a new hall which will give access to the new guest bathroom and the bedrooms on the first floor. Well, after a bit of work with a chainsaw (which I am not licensed to use, so I don't have one).
New doorway at top of the first stairs.
From the bedroom. The old door, left, will be closed.
Doing a couple of hours every evening after work meant that small tidying jobs quickly added up till the 7 cubic metre container was filled to about 4-5cu.m. Yesterday, we added a bit more as we began to clean down loose clay plaster from the ceilings. In some rooms, we'll leave the beams exposed, meaning the whole fine-coat of plaster has to be removed. Considerably more challenging that I originally though, in terms of the labour and energy needed, scraping away with shovels. A channel was then cut on each site of the beam to allow for nailing in a mesh to support a new layer of either clay or lime-based plaster.

Dirty work, but looks great after.
The kitchen, see below, also needs to be done like this. The clay here looks burnt, so we're not sure is this from a fire in the past, or if it is simply from decades of open fires in the old bakehouse.

Kitchen ceiling. Not looking forward to doing this.

In those rooms where the beams will be plastered over again, we simply removed the loose material, leaving most of the fine clay layer. In a way, it felt sad to be scraping away this stuff. The decades, or even centuries (at least 1.7 of them!) have left a mini stratigraphy of lime and paint, all taken away in minutes.
Ready for meshing or reed matting.

Having tired of this work on ceilings, which was tough on the shoulders, Joerg and I switched upstairs, where one final, large piece of clay had to go. The bit of ceiling above the new bathroom. This was going to be easier, as we could remove it from above, exactly like I removed the floor of the top attic levels. First step, remove the floor boards above the bathroom. An internal wall will later surround this hole, unfortunately taking a chunk from the room above.

Floorboards gone.
Once the clay and lathes were removed, it gave a nice aerial view of the future bathroom below. Most of the beams running vertically in the photo below will be removed (except those that play a structural role), leaving a bathroom with a 3-4m high ceiling, a real contrast to the low headroom in the rest of the house.

Looking down into the bathroom.
Looking up to the apex of the new gable dormer.
Feels like we're getting really close to actually start putting things back into the building, rather than ripping out!