Saturday 29 December 2012

A time to relax

For the past week, or nearly two, I've done sod all on the house, but I'm hoping this is the calm before the storm. The only real work was done by Lutz, our roofer/neighbour, who put a Schneefanggitter (a grill for catching snow, and I've no idea what it's called in English!) on the barn roof, so snow doesn't slide off and make piles in the narrow passage between the barn and house. We also received a delivery of 120m or so of 6x12cm timber (in 13m lengths, just about fitting in the barn) for building pretty much all the partition walls that we need, so that's the next big thing on the list.

Then we got a loan of an old range to give a bit of heat, as couple of weeks ago, when it was -11C outside, the house dropped to 0.6C, not ideal working conditions, especially for plastering.

On the bad side, last week we spotted that water is somehow coming in around the chimney. Lutz checked it out, but the roof tiles are perfect, so we're waiting on the sheet metal guys to check the flashing around the chimney. Last year was no problem, so we thought it might have been to do with the snow, but it's even worse the past couple of days, long after the snow melted. Not good! I'm wondering should I remove the Isofloc insulation around the chimney to stop it spreading, but maybe it'll dry out once the problem is rectified.
Poxy leaking roof.
 So, here's to a 2013 where we can move in!


Monday 10 December 2012

No weekly challenges, no rewards and no nice surprises

It's been a half-hearted week. Despite taking Friday off again to keep the pace up, I've only achieved some small things.

Early in the week, I filled the gaps between the insulation panels on the west gable. Nice, easy work that makes that side of the room look even more Lego-like. Next step: sticking on the wall heating panels.


I installed a new post under the rotted beam in our bedroom.

Now it can't fall so far...
And the one thing that I had really wanted to do, but failed, is plastering the outer wall of the kitchen. At least I've gotten it to a stage where it's ready to be plastered, but to be honest, I'm half afraid to start. All the other walls I've plastered will be hidden behind wall heating systems. Not so in the kitchen, where we'll have underfloor heating, so it has to be perfect. Between two doors and a window, a mix of wood, old clinker bricks and modern blocks, it's a total mish-mash, so stuff like reinforcement mesh, to prevent cracking at interfaces between these different materials, probably needs to be incorporated, but I'm not sure should that go into the base coats, over the rails I've installed, or later, in the top coat. I'll have to ask an expert. So, no rewards for me!

The outer kitchen wall last Monday
The wall on Saturday, rails in place.
Regardless, it's pretty cold now, with Friday night being -11C. Inside the house, it feels remarkably warm (relatively speaking!), and till recently was about 6 to 8C. But now, without any heat source, it's dropping, and working in the kitchen at about 2.5 C is not ideal for plastering. Might be time to start doing the dry construction bits...

In the meantime, we've come across several old window frames belonging to our neighbour, which we're thinking of using somewhere in the house, one idea being to put one between the kitchen and living room, as a kind of hatch through which to pass snacks. I've no idea of the date of this, but the ironmongery is lovely, and it appears to have original glass with lead strips separating the panes.

The outside.
The inside.
Although this might make a nice feature in the living room, I'd worry a bit abotut knocking holes in this wall, as it supports the big beam running across the kitchen, which in turn supports a fair part of the house above, so maybe somewhere else.

Trying to imagine how it'd fit.
In the meantime, a pair of gratuitous snow-shots, the first from December 2010, and the second from this week.


Saturday 1 December 2012

Weekly challenges, rewards and nice surprises

I like this idea of setting myself a weekly challenge. A couple of weeks ago it was to get all the ceiling beams on the first floor cleaned and ready for oiling, and I almost did it. This past week, I set myself the challenge to get the outer walls of the bedroom and "side room" (not sure if it will be my office, a walk-in wardrobe, or whatever) fully plastered and ready to receive the wall heating panels. My reward would be one of the special beers sitting in the cellar, so it was all to play for!

Monday evening, I started in the bedroom. Back in June, it looked like this:

The bedroom , back in June 2012
In fact, I only had one wall to plaster, having done the southern wall (the one with all the windows) a few months ago. I decided to just go at it, and got the wall done in a few hours, and pretty straight too!

Monday evening, after work.
Monday night, about 10:30pm.
The finished product.
The back room took a little longer, as loose plaster needed to be chipped off, paint scraped off the plaster that was still sound, expanded metal sheets put up where wood was exposed and then I decided to use a plastering rail system (you know, I don't know what this is properly called in English, but it's Putzschienen in German) in order to be sure the plaster would be perfectly even, given that the underlying walls were a bit of a patchwork.
The "back room" in January 2011, with connection to Kitchen
Last Tuesday evening, taken from the other corner ;)
I used these rails in the living room, and was pleased with the results, although this time I had a mishap, pulling one off the wall, so losing some time.

Rails and expanded metal sheets in place.
So, my challenge was finally completed early this evening, helped by the fact that I too Friday off work.

Now.
In between all this, I did some other stuff. There was some wood paneling between the two room that I too out, as well as the old door frame. Taking the paneling off revealed a post holding up the end of the beam that goes into the gable wall. I already found that the end of the beam had rotted, but the architect said it was OK, as it was supported by a post as well. However, once the paneling was removed, it was clear the post has also partially rotted. I've cut a new post that I can sister to the existing post, thereby maing sure that it won's slip off in the future.
Bugger!
 To counter that, something that really made me smile. When we first bought the place, amongst all the stuff still in the barn was what looked like a door, with two odd bolts, that I thought might have come from a feeding hatch, or something in the barn or stalls. But yesterday, while looking at the original of the old photo below, it suddenly dawned on me that the two bolts looked very like the ones on the door to the cow stall on the far right of the house. See? On the left side of the open, outer door.


Today, I took the door out to hang it on the old hinges, and what do you know, it's a perfect fit. Exactly the same door as in the old photo. The two bolts fit into notches in the sandstone frame, the latch on the outside fits snugly against a wire on the outside of the door, even the hook, just about visible dangling on the upper left of the door in the old photo is still there. It's a but worn and dusty, but I'm tempted to freshen it up and leave it there. I'd love to know how old that damn photo is.


So, a good week, with my challenge, and a little more, achieved. On to my just reward, which I'm enjoying as I type. Prost!

Bloody delicious!


Sunday 25 November 2012

Forgotten rooms

For the past while, between plastering, insulating and messing about, a couple of rooms have been more or less forgotten. Or perhaps avoided.In particular, the kitchen ceiling was a task I was not looking forward to, and the small room, which used to adjoin it. While my frind Siggi and I had done a good two days work on cleaning the beams in this small room and the bedroom, they still weren't quite in a state I wanted, so last week, I set myself a challenge to prep all ceiling beams on the first floor in three days, taking the Thursday and Friday off to do it. Needless to say, I didn't quite make it, as the big beams in the livingroom need another going over, but I'm pleased with the results. In particular, the kitchen, which alone too one-and-a-half days.

In the small, northeast room, the beams were clean enough, but I wanted to see what happened if I took an angle grinder with a sanding disc to one, to remove the bleached-looking, splintery layer. Quite well, I thought (see photo below), but it was such an effort, extremely dirty, and did take away some of the rustic "charm" of the uneven beams, so in the end, I decided it wasn't worth it. Instead, the beams got a couple of cleans varying between a 40-grit sanding wheel for getting rid of the splinters, and an 80 and 320-grit nylon brush, to polish them up a little, and get the remaining plaster out of the grooves. Here's an update in photos.

Back in January 2011
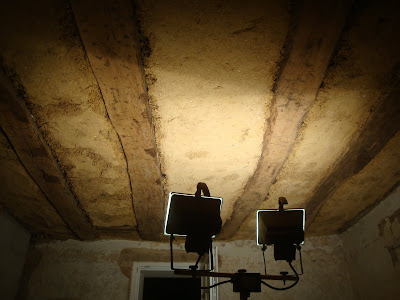
The ceiling now.

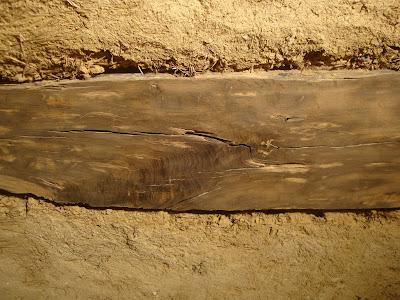
One of the beams (right in photo above) after deep cleaning.

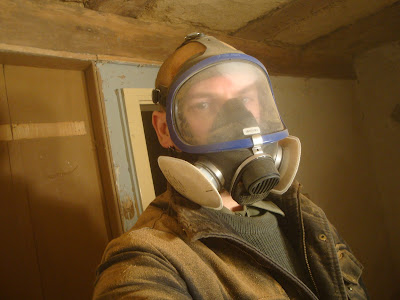
What I look like after deep  cleaning with an angle grinder.
Oak dust is particularly bad for the lungs. Till now, I'd usually been using a FPP2 filter mask with a vent and protection glasses, but the recommendation is FPP3, which it what I eventually used with the full face mask. Felt a lot better breathing, and no more bits of clay and oak in my eyes, which is common when working on the ceiling!

The bedroom got one more going over, although I did go deep cleaning the main cross-beam. As it had been painted, it really needed it to get as much of the point out of the cracks as possible. Here's a nice sequence for an update, having stitched photos together using the free Hugin panorama software (because I don't have a fancy camera). Click on the images below for embignation!


January 2011

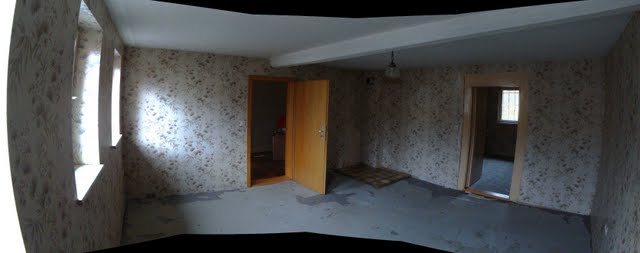
Around September 2011.
November 2012
Some plastering, and it's almost ready to use. Well, almost...

And to the kitchen. Having started life as two rooms that we mashed together, and then gutted, removing all the cladding, dry lining and false ceiling, we were left with a decent sized room with soot-blackened beams. Looking back over old photos, it's just as well I forgot how much work we did just in ripping stuff out. The kitchen in particular was a filthy job.


January 2011. Still two rooms
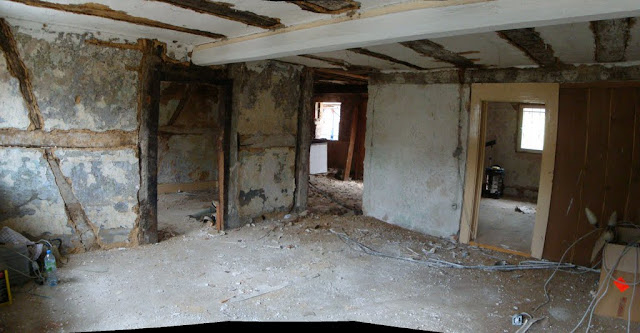
Around September, 2011. Everything ripped out.
We'd also had to get in a new post to hold up the middle of the beam. This we got from a neighbour's wood pile, where it had clearly sat for a while, but was in great condition, other than being a bit geen, and soft at the corners. That got the treatment last week too.

January 2012, new post after initial sand-blasting of the ceiling
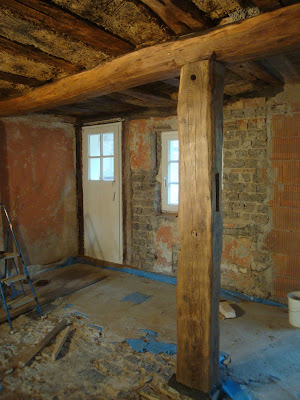
The post today, almost gleaming.
 The main beam got a deep clean last week, as it was quite pitted from the nut-shell blasting, which did not quite remove the carbonised-looking sooty layer. The result, was a lighter-coloured bean, which I like, as the ceiling here is low, and a dark beam would have made it oppressively so. The cross-beams just got a clean with nylon brushes, and they came out pretty well, although still quite rough, which I can live with.

All cleaned up, November 2012.
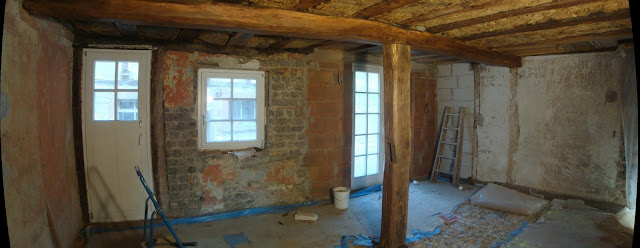
Still a lot to do here...
The hall also got done before I could take no more, laving the two main beams in the living room, but I'll tackle them later.

For the next week, I'm setting myself a new challenge: get the undercoat skim plaster onto the bedroom and back room walls done by next weekend, so they are ready to receive the wall heating system (once I finish insulating the south side of the house, but more of that anon).

Sunday 4 November 2012

Groundhog Day

Before I get to what's new, here's a nicer shot of the outside of the house, after the sun came out on Wednesday.

As Thursday was a national holiday here, I took Friday off too with the intention of getting back into the kind of work readers would hope I'd be finished with, not to mention me. Our friend Siggi popped down from Bonn to help, and I'm sure he was sorry also, as he basically spent 2 days looking at a ceiling, with a brush sander in hand.

Our bedroom has been neglected for the past few months,. The beams didn't even get the sand-blasting treatment, as originally I thought I'd plaster over the whole lot, but the more wood the better, or so I'm told.

First, a look back, starting with late 2010, just after we'd bought the place.


Step on to September, 2011, and the plasterboard/dry lining has been removed, as well as the chimney, leaving a new hole into the kitchen. Note the clay plaster on the ceilings, and the white-painted main beam.


By May this year, the old plaster had been removed from the ceiling and walls, and the initial paint removal done (horrible, horrible work)...


...which looked quite nice, leaving only finer cleaning of the wood to be done. Below is the old door frame into the room.


And as of yesterday, much cleaner, showing details in the grain of the oak that I really like.


Not to mention the door lintle is holding up the main support beam running across the room.


Siggi got the blackened dirt off the ceiling beams, and we both worked on cleaning up the main beam, which also showed some interesting hidden textures.


This beam feels like the hardest substance on earth, and takes a lot of time to clean or sand off. Too much force or speed, and it clogs sanding discs, resulting in friction burns that need to be sanded down with care. Basically, it's a pain in the ass, and this is the second one on this level to be prepped.


Fairly pleased with this, but some additional polishing is needed before we can start plastering the ceiling.

Meanwhile, it's been raining for 2 days almost non-stop, and there's some seepage into cellar 2, despite the new gutters and drainage behind the house.