Thursday 10 November 2016

Cider time: the press in action

I'm falling behind in updates, but that's simply down to being too busy. But my son and I both made videos of the press in action over the past few weeks.

I now have 310 litres of cider fermenting. 120 of which are in one of the oak casks, and 50 litres which were made with a mix of apples and grapes, which were given to me by a neighbour. I have one more pressing session to do, to try out keeving with 60 litres, and maybe some more milling, to make 100L mash for making schnapps. However, I think I'll need help, as my shoulder is in a bad state, so hand-cranking that mill will not be good for it.

But on to the videos!

First, from my 11-year-old son, his second effort at making a video, which I tink he did a really good job on. I must post the one he made of the harvesting!


And then my slightly dryer version, a week later.


People love stopping to watch this going on, and I've heard so many tales now from old people, about how there used to be a giant hydraulic press in our barn, which was used by the community. I'd be happy to reinstate such a tradition, once I get a motor for the mill!

Thursday 13 October 2016

The old fruit press, part 3 - finished!

It didn't need too much work to finish the last pieces this evening. But finally putting it all together was very rewarding. Looking forward to trying it out now!

Wednesday 12 October 2016

The old fruit press, part 2

Part two of the old fruit press restoration, for your viewing pleasure.


It's been great fun so far!

Monday 10 October 2016

The old fruit press, part 1

This goes straight to video!


A bit later than planned, as this was recorded on Sunday.

Friday 7 October 2016

Another project: An old fruit mill and press

So a couple of weeks ago, i decided I would really like to have a press, so I could have more control over my cider making, at least for small batches. I saved a search on eBay small ads, so anything popping up with 50km of us would show up. But then, last Saturday, I got a message from a friend asking if I would like a press, as they had one in a barn they're going to sell. It was fate!

The next morning, we went over for a look, to find there wasn't just a fine old press, but a couple of old fruit mills too. Now, I had already been looking for a staiunless steel electric model, perhaps even buying one together with a neighbour to share the expense, so i wasn't too interested in the dirty old mill. However, that very day, we were off to a festival, to man a stand pressing apples for juice to sell. And what kind of mill did they have? The c´very same kind. Well, it was a booth for the local museum, after all. So, that was decided, It worked brilliantly, looked the biz, and if it's been used for decades, it must be good. I'd take it.


Fast forward to yesterday (Thursday) evening, and we borrowed a friend and his trailer, and off we went to Allfeld to pick up the press and a mill, with a large barrel thrown in fora few homebrews.

The press and mill were layered in mud, as back in May, there were serious floods in our region, and Allfeld was one of the worst hit villages. Large parts of street were washed away, and the barn where the mill was, was right on the banks of the Schefflenz, so was filled to about 1.7 metres of water, with all the mud it carried. We escaped lightly here in Schefflenz. So, it was hard to see the true condition of the mill and press. Today was time to get out the high pressure washer,and blast the dirt off. Have a look at the video to see the mill in action, and in various stages of dismantling.


Saturday 1 October 2016

Two-wheel tractors

No, not a tractor that's been sawn in half, but a walk-behind tractor suitable for small-holders, being capable of ploughing, tilling, mowing, or even hitching a trailer behind and driving around. All of the above appeal to me, for looking after our orchard, and eventually setting up a vegetable garden in a year or two.

Have a look at the video for a quick intro!


Friday 29 July 2016

Bathroom panelling finished!

We moved in just over 17 months ago, and every day, I've looked at the paneling I made in the bathroom, and thought, "I must finish that".


The problem was not the material, as I've had that at least that long, but the fact one board was too short, so I hd to lengthen it. Without a table saw, I could not cut precise enough to butt-join two pieces without a gap showing, so it was only recently that I got help from a friend to get a suitable cut.

Once cut, the two pieces were joined with a biscuit joiner, and a strip was glued underneath, to give the impression of a thicker board, much like I did with the window sills, so long ago.


The front was then planed and sanded, to make that join as seamless as possible.


The wall behind the sink is pretty uneven, so some careful marking, then cutting with a jigsaw got as near a perfect fit as I could manage.


To take the hard edge off it, i used a hand router to put a 3mm radius curve on the top edge, so it matches the window sills, and to take the weighty look off it a bit, I used a more decorative cutter on the bottom edge, which mirrors that of the bottom skirting. Then the whole thing was given 4 coats of varnish and glued in place.


Job done!

Next for the bathroom will be to rig some system to hang a mirror and extra storage from.


Tuesday 17 May 2016

Vaulted cellar 2, part 3: plastering done

A quick video-only update this time. After all the fun with the barrels (which are still holding water, you'll be pleased to know), I got back to the cellar and finished the plastering off. Now to sort out the floor.

Monday 2 May 2016

Barrels stands and first fill.

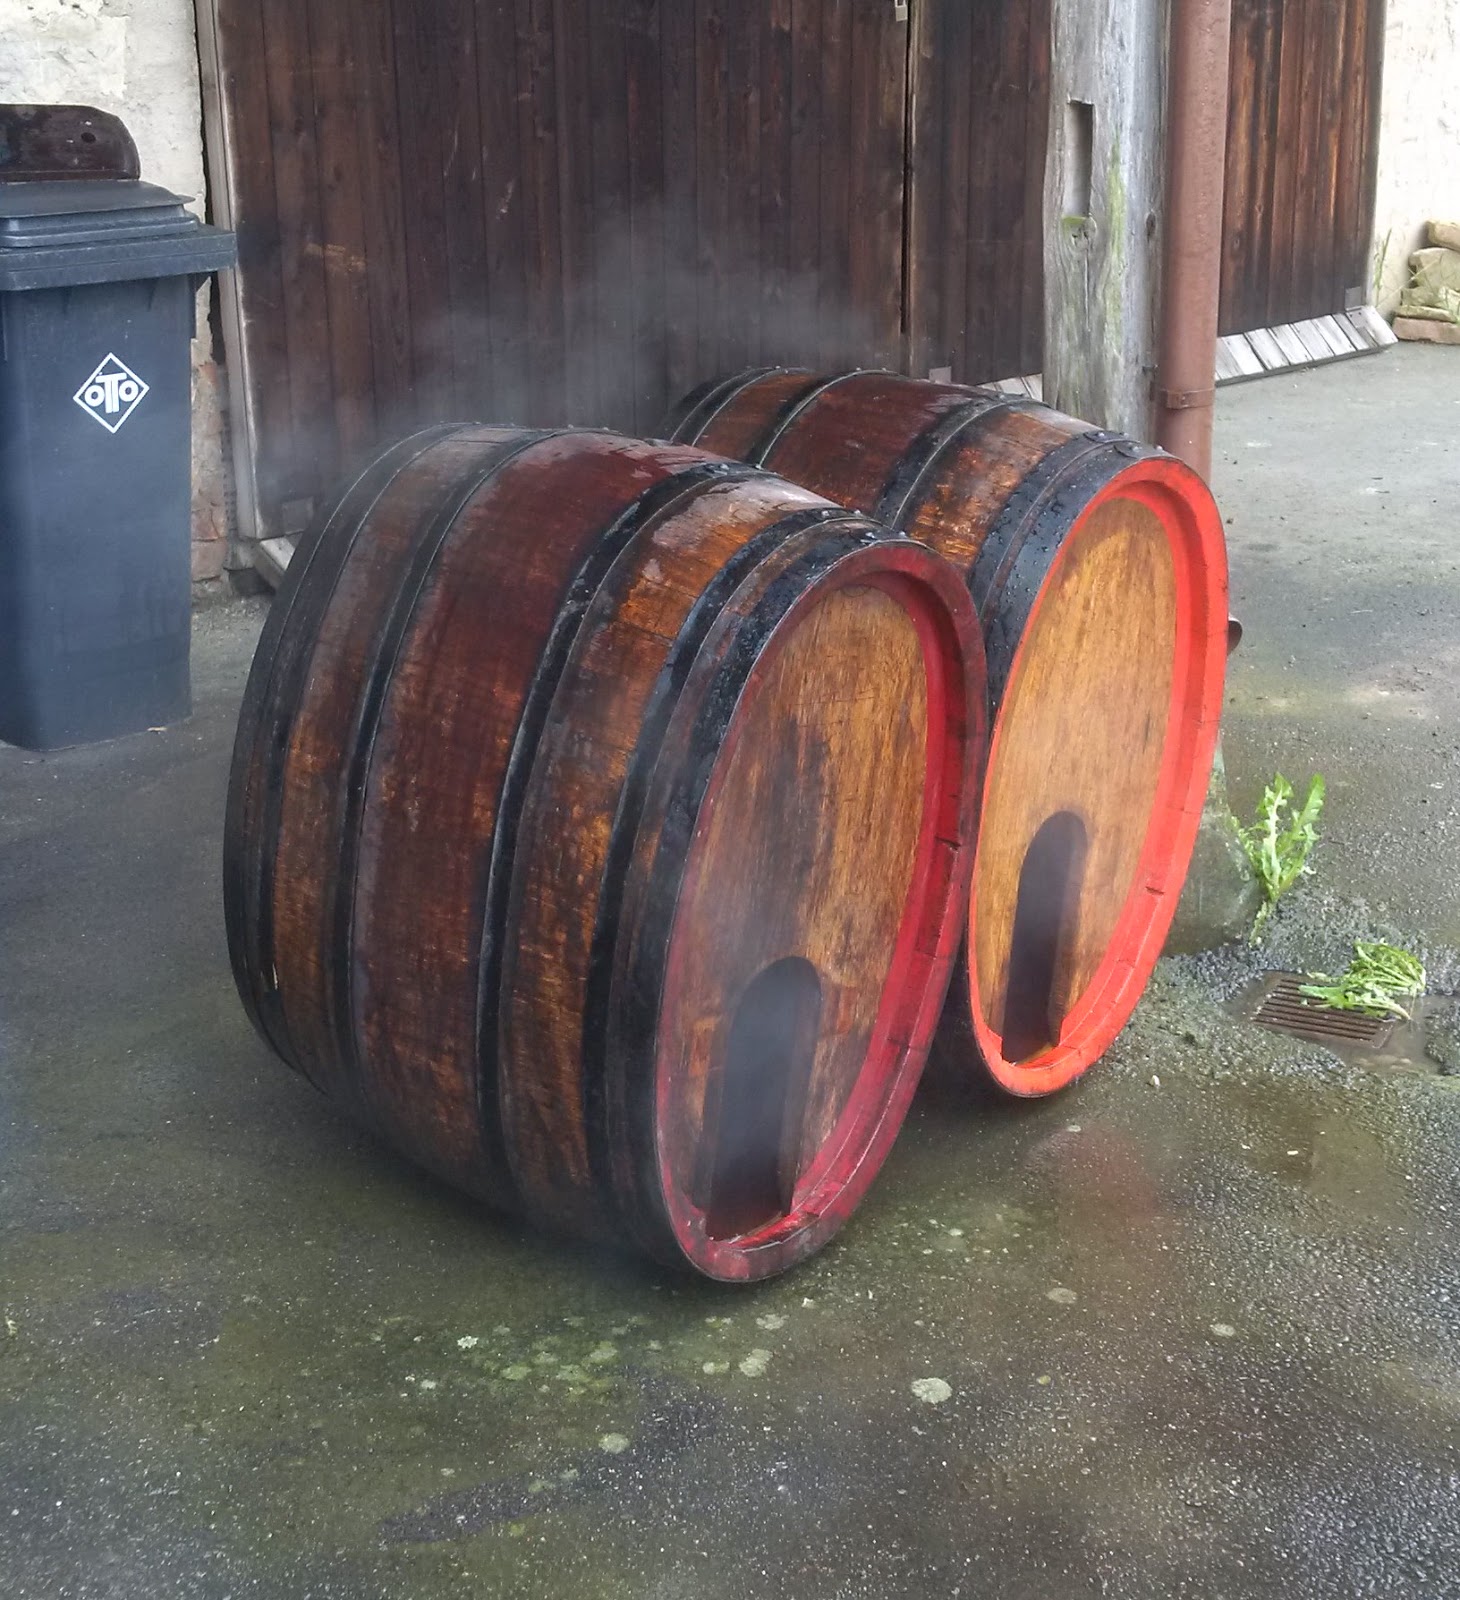
These barrels have become something of a fixation over the past week, as I wanted to get them into a state fit for long term storage, it several senses of the word. First, I needed to build stands to store them on, and preferably be able to move them around once filled, as I don't have a fixed home for them just yet. Luckily, materials are usually not a problem, as I don't like throwing our old timber, as long as they are not worm-eaten at least.

For the first one, I used some old 10x12cm roof beams to make a very simple construction, but perhaps unnecessarily complicated when it came to carving our the curve of the barrel.


The whole thing was easily put together with 12 large screws, so it ain't going to fall apart any time soon.


But chopping out the curve across a 10cm wide block was not as precise as I would have liked. It took several rounds of adjustment, and going a bit deeper, till I got a nice, even fit and support all round.


And the barrel fits well. The only possible issue is that as the barrels are oval, the centre of gravity is quite high, so there is a tipping point, if it tilts too far in one direction. I figured then when filled, it will weigh the guts of 180kg, so should be resistant to moving too much, but some day, I'll line the curves with rubber, to give extra resistance.


For the second one, I went with a slightly simpler design in terms of work, at least, though the construction was a little more complicated. In this case, I used 3cm thick oak boards that came from the old cow stalls, and the 10x12 roof beams.


I carefully measured the curve of the barrel, using a spirit level, a try square and a ruler, and marked this on the board. I then set the angle of the barrel base on a jigsaw and simply cut it out. There were some minor adjustments to be made, again with the jigsaw, but this was much quicker than hacking stuff out with a semi-blunt chisel. With a bit of rudimentary joint work, the pieces were ready to assemble, but they just needed a bit of cleaning.


Cue one of my favourite tools, the Makita brush sander, without which, the old beams in the house would not be so pretty. It's a great tool for cleaning wood, without removing too much material, as can be seen in the before and after shots below.


And it was done. A little help with a mallet, and the pieces are tight and stable, and it feels like the deeper curves hold the barrel better.


All that was missing were the wheels, which were duly purchased and fitted the next day. Each can support 60kg, so I thought that should be ok.


The next step, which I couldn't wait for, was to seal the doors and fill the barrels with a solution of Potassium Metabisulphite and Citric Acid. Sounds dangerous...

When I got the barrels, there was a greasy substance all over the doors that I later figured was a paraffin-based sealant called, appropriately enough, Fasstürdichte, or barrel door sealant. I bought a new block of this online, along with the campden and citric acid, which are both used in wine-making, so it was a one-stop shop. The doors themselves were in fairly good condition, with the exception of the little cover blocks, that served to act as a lid for the brass T-piece that goes through the door, allowing a nut to pull the door into the hole, thus giving a tight seal. The blocks were a bit tired-looking, and the brass pieces dull, with a little green in places, so I gave them all a good going over. Although I was tempted to make new blocks from pieced of oak I have in store, I was unsure if this would be introducing something "foreign" to the barrels, so stayed with what they came with.

First, a light sanding spruced the blocks up.


The insides of the doors also got a light sanding, to remove the old sealant too, and ensure an even surface before screwing the cover blocks on again.


The brass T-pieces also got a bit of a polishing with fine sandpaper, so they looked almost new...

 almost...

The next morning, after getting the wheels and attaching them, it was time to close the doors. I hadn't googled about how to do this, so based the process completely on what I had seen when taking the things apart.

First, I cheated a little and used a section of silicone hose to act as a seal between the brass threaded rod and the door itself. One was a little loose in the hole, so this worked well, and I felt it was better than using insulation tape, which was previously wrapped around the rod.


Then is was out with the Fasstürdichte, like a lump of bog butter.


I was pretty generous, using a scraper to fill the recess for the T-piece, then tightening the bolt to pull it tight, so that the sealant was well bedded, and squeezed out around the piece.


And then filled the remaining space. I forgot to take a photo of the stage after, but basically, the wooden caps were screwed over this, to prevent the T-piece being pushed back into the barrel. I used stainless steel screws, which I felt were better than the corroded brass screws previously used.


So far, so good, I felt. The door openings then got a smear of sealant around the inside edge, as I reasoned that as the door pushes into the opening from the inside, it would push the sealant out, and give a good seal.


And then it was time to fill. I hammered home wooden bungs that came with the barrels, using a little sealant as an insurance measure. I then half filled each barrel, then mixed a solution of 2g potassium metabisulpite and 1g citric acid per litre, as per instructions, poured that into each barrel and finally filled the barrels to the brim. The seals held perfectly.


There was only a couple of seepage sites, one at a hairline crack above the door, but 24 hours later, this had closed itself off, as the wood expanded, and I was a very happy bunny. Two water-tight, clean barrels, on self-built stands, ready for whatever I want to put in them later this year.


So far, so fantastic, and the rest of the day was spent enjoying the Maibaumaufstellen, right at the end of our street.


But it doesn't end there...

I have zero experience with wooden barrels, and today I learned a small lesson when, at lunchtime, I spotted a puddle outside the barn. The wooden bung on one of the barrels had popped out, probably early in the morning. I think using the sealant on the bungs was a mistake, as it probably acted more like a lubricant when the angle of the bung isn't making it wedge into the hole with pressure from the inside, like the door does. With 135 litres pushing against it, it clearly just slid out. Lesson learned. I've cleaned the hole and bung, and hammered it in tight, but for the longer term, I'm considering fitting a stainless steel tap permanently to the barrel, with a nut on the inside to make sure this won't ever happen when it is filled with booze!


Today, I refilled it, and the bung is quite secure, with no sealant!

It might seem I've put a lot of effort into these two barrels, but I feel that they're worth it. They're probably older than me, and probably in better condition, and I think it'd be a shame to see them turned into some sort of decorative feature, when they can still fulfill the purpose for which they were built. I hope I can do them that honour at least.

But now, they need to wait, and I'll probably return to plastering the second vaulted cellar. Who knows, maybe these two beauties will find a permanent home in there,

Monday 25 April 2016

Barrels of fun

A few weeks ago, a friend mentioned that his grandmother was getting rid of two old oak barrels previously used for making Most, the local version of apple wine or cider. Rather than seeing them dumped, I made an offer, and finally collected them last Friday evening. They were still filled with Most right up to a few hours before I picked them up, Most that was, I was told, nine years old, and very, very dark.
Pre-clean
I'm not sure how old they are, but I was pleasantly surprised at the condition they were in, and they smelled like an old, tannic wine, rather than vinegar, so a great start. My friend Jonas had thoughtfully rinsed them out, but had kept a jar of the yeasty sludge from the bottom, but I'm not sure I'll be using it.


Capacity-wise, one is marked as 150 litres, and the other as 135. The design is interesting, being oval, or rather elliptical, in section, and each has a large opening on the bottom front. The opening is closed by a piece of wood clearly simply cut from the lid, with a camber, such that when it is tightened, using the brass bolt passing through this "lid", is makes a tight seal. But it was also smeared in a waxy-feeling substance, that I first thought was silicone, but turned out to be a paraffin-based sealant, specifically designed for this kind of use. The lid also has a hole for a spigot, but I think I'll be buying new ones.


The next day I got a loan of an industrial-sized steam generator/pressure cleaner. Having the pressure set low, and the temp at 110 degrees, I went over the interior a few times, and am satisfied they are well clean. This also cleared off the waxy layer around the opening, though I had to do a bit of scraping on the lids themselves, to get back down to the wood.


One thing that did give me pause, though, was the speckles of greenish stuff that I first feared was mold on the bottom of both barrels. They didn't come off, and in fact were kind of glassy. I finally realised it was probably residue from burning sulphur strips, of which I inherited a few wrapped in a 1992 newspaper page. They're the same colour as the speckles.

Sulphur residue? Pre-clean.
The big brass bolt that passes though the lid means there is a hole though it, and it seems the way this was closed was to cake the recess for the bolt on the inner side with the sealing wax, and to cap this with a piece of oak. Sadly, whatever was used to secure this piece of wood is gone, so I'll need to sort that out, maybe using stainless steel screws. The pieces of wood are also a little manky, but I'll see how they clean up with a bit of sanding and steaming,

Wax seal over the brass bolt.
Right now, the barrels are sitting in the barn, empty, which I'm sure is not the best for them. I put out a call for advice on Twitter, and got lots of great advice, including from a cooper, who suggested filling with water at more than 80°C and a pint of salt 24 to 48 hours before using again, but given my situation, this is impractical. I would find it very difficult to heat 285 litres of water, and as I won't be using them for some time, I need a way to keep them acetobacter-free and moist for some months. Several people pointed me to articles, and indeed, I also bought Michael Tonsmeire's book on making American Sour Beers, which also advocates using a potassium metabisulphite and Citric Acid solution for long-term storage, which is what I will probably do. I treat my cider with potassium metabisulphite anyway, so I'd be happy with that. The only worry I might have is whether this might leach character from the barrels, so I am open to advice still.


But what will I do with them? I could of course fill them with cider come autumn, or maybe use that as a wash to get distilled for apple brandy, and it might add some character. But as a brewer, the idea of aging beer in them of course appeals. I'd love a whisky cask, but beggars can't be choosers. Some people have said you can never use a cider barrel for anything other than cider, but I guess they haven't tried sour beers or lambics. I can imagine a tartness from cider might match that well, or maybe a Saison. But with my current brew kit, that means seven brews for the bigger barrel! Might be time for an upgrade so!